- Home
- About
- Products
- Contact Temperature Sensors
- Cables & Wires
- Mineral Insulated Cables
- Nickel & Thermocouple Alloy
- Industrial Heaters
- Heating Cables and Mats
- Non Contact Temperature Sensors
- Industrial and R&D Furnaces
- Temperature Calibrators
-
Circulating Chiller
- Services
-
Special Products
- Thermal Profiling System
- Industries
- Resources
- Contact Us
- Shop
Search
High Temperature Infrared Calibration
High Temperature Infra red calibration requires a laboratory equipped with high performance Thermal radiation sources along with highly accurate transfer standard.
The following equipments are must for any infrared thermometer calibration.
- Thermal radiation source (BlackBody)
- Transferstandard
- Ambient temperaturethermometer
- Mountingdevice
The thermal radiation source or a Black Body is a calibrated temperature source that radiates energy which is used to calibrate the infrared thermometer. The strength of the radiation is dependent on the source’s temperature. One of the major concerns in choosing a radiation source is how big the radiating area should be. Much of the concern is due to the infrared thermometer’s field-of-view. The information related to field of view of an infrared thermometer should come from the infrared thermometer manufacturer or be determined by experimentation.
The transfer standard is used to calibrate the thermal radiation source. The transfer standard must be calibrated from a better laboratory that means a laboratory having lower BMC (Best Measurement Capability). The transfer standard can be a contact thermometer (a PRT, thermistor, or thermocouple) or a non-contact thermometer (a radiation thermometer or pyrometer). The transfer standard may be implemented internal to the laboratory performing the infrared thermometer calibrations, or may be implemented using a third party laboratory external to the lab performing the infrared thermometer calibrations. The ambient temperature thermometer is used to monitor the temperature inside the laboratory. This is especially important because for some infrared thermometers, ambient temperature plays a big role in uncertainty, as the ambient temperature affects the reference temperature of the infrared thermometer. The mounting device is what holds the infrared thermometer during a calibration. The mounting device maintains the measuring distance and alignment of the infrared thermometer during calibration. The mounting device may be a tripod or a fixture. A device should be used to determine measuring distance. Measuring distance is the distance from the radiation source to the infrared thermometer. The distance measuring device will typically be a tape measure or a measuring rod.
A proper laboratory set up with a guided procedure over the appropriate calibration points is required to perform a error free calibration.
Laboratory Set Up
In order to perform infrared thermometer calibrations with minimized uncertainties and minimized errors, a proper laboratory setup should be observed. The ambient temperature in the laboratory should be maintained within reasonable limits as approved by the accrediting body. The ambient temperature during the calibration or the laboratory’s temperature limits should be stated on the report of calibration.
It is important as it provides the customer information about the environment that the infrared thermometer was calibrated in. After maintaining appropriate temperature using Air conditioners inside the laboratory the next thing comes up the positioning of the calibration sources and the infrared thermometer. The positioning of equipment within the laboratory is critical. One of the biggest concerns is reflected temperature. This is especially a matter of concern when performing calibrations at lower temperatures or near room temperatures. To properly account for reflected temperature, the following things should be kept in mind. First, do not place a heat source facing the radiation source. Second, make sure that the temperature of the walls facing the radiation source is that of the laboratory. This is especially a concern if the wall facing the radiation source is an exterior wall or an exterior window. Heated walls can cause a problem if the radiations coming from them are detected by the infrared thermometer. Third, the position of the technician performing the calibration should be considered, since he/she influences the reflected temperature. For calibrations at temperature below 50 °C or near room temperature, we can use a divider, may be a wooden divider which needs to be placed between the technician and the radiation source. Forced air flow should be controlled inside the laboratory. There should not be any forced air be near the surface of the radiation source. This means care should be taken not to set up the radiation source near (or beneath) any AC vents and doorways.
Calibration Procedure
Before starting the calibration, the infrared thermometer should be allowed enough time to reach the temperature of the laboratory, typically 15 minutes That means after the electrical connections have been made, before taking the measurement the it should be allowed to stabilize in the ambient conditions. This is an especially important on consideration when bringing a thermometer in from the outside. Make sure the technician has a complete user manual from the infrared thermometer manufacturer clearly explaining how to use it. Any lens cleaning that is done should be done with the permission of the customer and according to the infrared thermometer’s manufacturer’s recommendations. The radiation source should be set to the desired calibration temperature and should be allowed to stabilize.
Calibration Points
alibration points are based on the customer’s wants and needs. If the infrared thermometer is used over a narrow range of temperature, one calibration point may be enough. For an infrared thermometer used over a wide range of temperatures, at least three points should be used. These points should represent at least the minimum, maximum and mid-range of the infrared thermometer’s usage range. The order of the calibration points may be chosen in an arbitrary fashion. However, due to the phenomenon of thermal shock, it is best practice to perform the lower temperature calibration points first and the higher calibration points last.
Performing Calibration
The following steps should be repeated for each calibration point. The radiation source should be set to the required temperature. The emissivity setting of the infrared thermometer should be the same as the source’s calibrated emissivity. Some infrared thermometers have a fixed emissivity. In these cases a mathematical correction may be made. The next step is to mount the infrared thermometer. To do this, first set the measuring distance. Once the distance is set, the infrared thermometer should be mounted on a mounting device maintain the essential distance from the radiation source. The measuring distance should be kept such that the spot size of the infrared thermometer is less than the radiating area. For the details of the field of view of the infrared thermometer its manufacturer manual can be considered. The next step is to align the infrared thermometer so that it is centered on the calibrator surface. This can be done by using the laser provided with the infrared thermometer, or in case there is any other sighting device, or by maximizing the signal by moving the infrared thermometer up and down and side to side. When alignment is completed, the line from the infrared thermometer to the calibrator surface should be perpendicular. At this point, a measurement is ready to be made. The measurement should be initiated. The measurement time should be ten times longer that the infrared thermometer’s response time. For handheld infrared thermometers, the measurement is made by holding the trigger for five to ten seconds. The resulting final readout temperature should be recorded as the readout temperature for the calibration. After the set up has been made and the calibration source has been stabilized, it takes few seconds to record a calibration point for the technician. Depending on the number of points and the temperature it takes different time to calibrate different infrared thermometers.
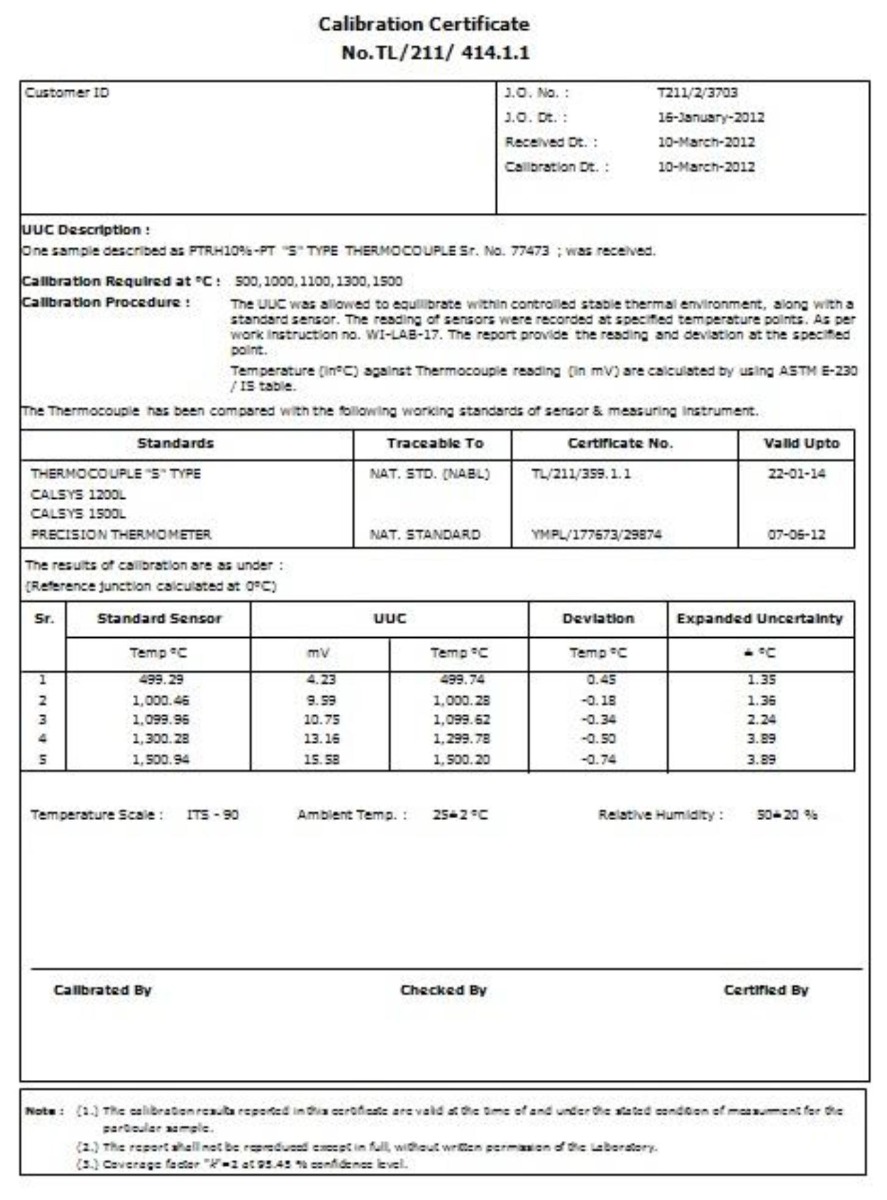
Making Reports
The report of calibration is a communications tool between the laboratory and the customer. The report should be in a standardized form and should meet the requirements of your laboratory’s accrediting body. The results of the calibration should be reported. This is best represented by a table of source temperatures versus infrared thermometer readout values. The report should include the following items:
- Title
- Unique identification of the calibratedinfrared thermometer
- Record of the person who performedthe calibration
- Date ofcalibration
- Source temperature versus infraredthermometer readout temperature
- Master thermometer traceability
- Calibration Points
- TemperatureScale
- Measuringdistance
- Emissivity setting of the infraredthermometer
- Diameter of thesource
- Ambient temperature andHumidity
- Description of the aperture includingaperture Distance (if used)
- Validity
- Measurementuncertainties
Other supplementary information such as a description of the calibration procedure, a list of reference instruments used, and a description of the uncertainty budget may be included in the report as well.